[Swift] HealthKit을 이용해서 기기에 저장된 걸음수 가져오기
나중에 회사에서 HealthKit을 사용할 거 같아 사용해본 경험을 기록하기 위해 글을 씀.
이번에 Swift 5.5에 추가된 Concurrency 기능도 함께 써보기 위해 iOS Deployment target을 13.0으로 맞췄음
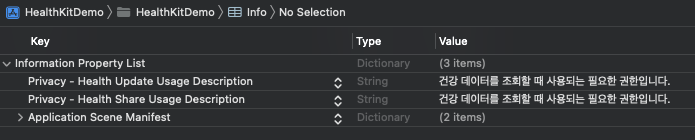
HealthKit 권한 추가하기
일단 HealthKit에 접근하기 위해 권한을 추가해야한다. Info.plist에 아래의 권한 두 개를 추가한다.
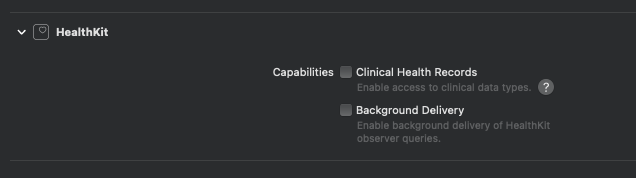
그리고 타겟의 Signing & Capabilities 로 이동해서 HealthKit을 추가한다.
이제 기본적인 설정은 다 되었다. HealthKit을 관리하는 클래스를 만들어보자.
필자는 HealthKitStorage.swift로 만들었음.
import HealthKit

final class HealthKitStorage {
  static let shared = HealthKitStorage()

  private let store = HKHealthStore()

  // 접근할 카테고리
  private let typesToShare: Set<HKSampleType> = [
    HKObjectType.quantityType(forIdentifier: .stepCount)!
  ]
}
어디서든 접근할 수 있게 싱글톤 패턴을 사용하였다. 이제 권한 요청 함수를 만들어보자.

처음에는 Deployment Target을 iOS 15로 잡고 애플이 구현한 async / await 함수를 사용해보려했는데…
신기하게 requestAuthorization 함수의 반환값이 없어서(왜 없지?) 깡으로 async / await를 구현해보았다.
// MARK: - HealthKitStorage.Concurrency
extension HealthKitStorage {

  final class Concurrency {
    private let store: HKHealthStore
    private let typesToShare: Set<HKSampleType>

    init(_ store: HKHealthStore, toShare typesToShare: Set<HKSampleType>) {
      self.store = store
      self.typesToShare = typesToShare
    }

    func requestAuthorization() async throws -> Bool {
      return try await withCheckedThrowingContinuation { continuation in
        /*
         The success parameter of the completion indicates whether prompting the user, if necessary, completed
         successfully and was not cancelled by the user.  It does NOT indicate whether the application was
         granted authorization.
         */
        store.requestAuthorization(toShare: typesToShare, read: typesToShare) { isSuccess, error in
          if let error = error {
            continuation.resume(with: .failure(error))
          } else {
            continuation.resume(with: .success(isSuccess))
          }
        }
      }
    }
  }
}
유의해야할 점은 권한 거부해도 isSuccess는 true를 반환한다.
async / await도 깡으로 구현했겠다, 이제 본체를 구현해보자.
  func requestAuthorizationIfNeeded() async throws -> Bool {
    // 헬스킷 사용 가능 여부 확인
    // 헬스킷은 아이패드에서 사용할 수 없다.
    guard HKHealthStore.isHealthDataAvailable() else {
      print("아이폰 외 다른 기기에서는 사용할 수 없습니다.")
      return false
    }

    guard let concurrecy = concurrecy else {
      fatalError("Concurrency is not supported.")
    }

    return try await concurrecy.requestAuthorization()
  }
위와 같이 구현했으면 viewDidLoad에서 호출해보자. async / await로 작성된 함수는 Task 안에서 호출할 수 있다.
  override func viewDidLoad() {
    super.viewDidLoad()
    Task {
      let isSuccess = try await HealthKitStorage.shared.requestAuthorizationIfNeeded()
      // 권한을 허용했다는 여부는 아니다!
      print("성공 여부", isSuccess)
    }
  }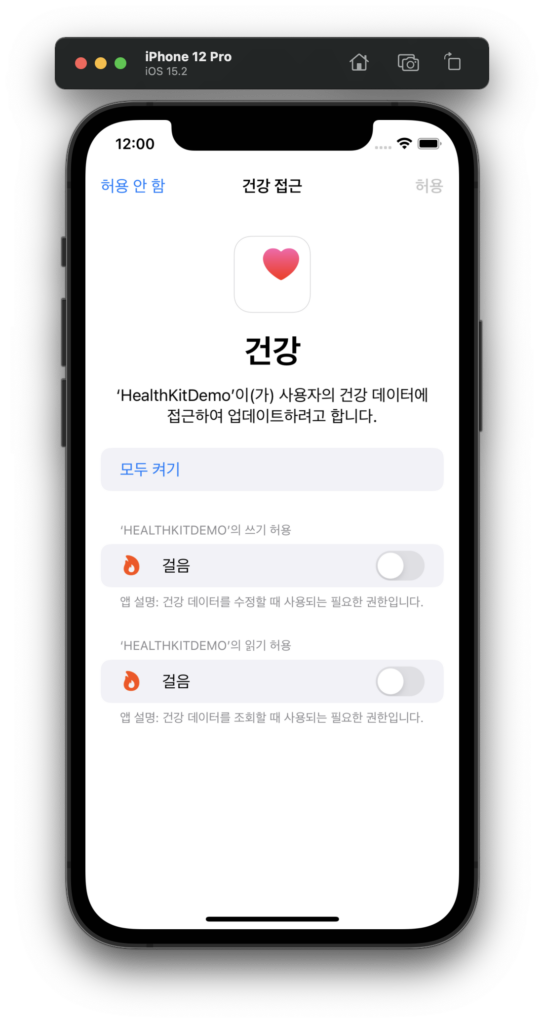
앱을 실행한다면 위와 같이 권한 허용 여부 화면이 올라오게 된다. (커스텀 불가능한듯..?)
이제 걸음 수를 가져오기 위한 함수를 구현해보자.
    func retrieveStepCount(predicate: NSPredicate) async throws -> (HKSampleQuery, [HKSample]?) {
      return try await withCheckedThrowingContinuation { continuation in
        guard let stepType = HKSampleType.quantityType(forIdentifier: .stepCount) else {
          let error = NSError(domain: "Invalid a HKQuantityType", code: 500, userInfo: nil)
          continuation.resume(throwing: error)
          return
        }

        let query = HKSampleQuery(sampleType: stepType,
                                  predicate: predicate,
                                  limit: 0,
                                  sortDescriptors: nil) { query, sample, error in
          continuation.resume(with: .success((query, sample)))
        }

        store.execute(query)
      }
    }
위와 같이 Concurrency 영역에 구현해주고, 본체에는 아래와 같이 작성한다.
  func retrieveStepCount(withStart start: Date?,
                         end: Date?,
                         options: HKQueryOptions) async throws -> (HKSampleQuery, [HKSample]?)  {


    let predicate = HKQuery.predicateForSamples(withStart: start,
                                                end: end,
                                                options: options)
    guard let concurrecy = concurrecy else {
      fatalError("Concurrency is not supported.")
    }

    return try await concurrecy.retrieveStepCount(predicate: predicate)
  }
굳. 호출은 아래와 같이 하면 된다.
      let currentDate = Date()
      let startDate = Calendar.current.date(byAdding: .year,
                                            value: -1,
                                            to: currentDate)

      let (_, samples) = try await HealthKitStorage.shared.retrieveStepCount(withStart: startDate,
                                                                             end: currentDate,
                                                                             options: [])
전체 프로젝트 코드는 여기서 받을 수 있다.
애플이 간단하게 건강 데이터를 가져올 수 있도록 구현해줘서 매우 쉽게 만들 수 있었다.
최신 댓글